Compile Env Setup
Set up developing environment
Step 1. OS environment
AI Wearable glass currently supports Windows OS 64-bits (Windows 10 and above), Linux OS (Ubuntu22 and above) and MacOS (Intel and Apple Silicon). To have the best experiences, please use the latest version of OS.
Step 2. Installing the Driver
First, connect AI Wearable glass to the computer via Micro USB:
Check the COM port number in Device Manager of computer:
Step 3. Set up GCC Building Environment (window)
Installing mingw with ASDK and setting up the CMake
Download and extract msys64_v10_3.7z from https://github.com/Ameba-AIoT/ameba-tool-rtos-pro2/releases/tag/msys64_v10_3
Double click “msys2_shell.cmd” from mysys64 folder
After setting up mingw, you need to install cmake. Download cmake in https://github.com/Kitware/CMake/releases/download/v3.20.0-rc1/cmake-3.20.0-rc1-windows-x86_64.msi and install it
Add location of cmake.exe to PATH of msys2_shell by using vim ~/.bashrc and appending path of cmake.exe to environment variable PATH or using editor to directly append the path to file “msys64/home/<USER_FOLDER>/.bashrc”
export PATH=/c/Program\ Files/CMake/bin:$PATH
Caution
If your PATH contains space characters, remember to use “\” to escape
Note
For the first time adding the CMake PATH, after adding the PATH, you need to re-open the msys2_shell and check the version by:
$ cmake --version
cmake version 3.20.0-rc1

CMake suite maintained and supported by Kitware (kitware.com/cmake).
Adding toolchain to msys2
Download and extract asdk-10.3.0-mingw32-newlib-build-3633-x86_64.zip from https://github.com/Ameba-AIoT/ameba-toolchain/releases/download/V10.3.0-amebe-rtos-pro2/asdk-10.3.0-mingw32-newlib-build-3633-x86_64.zip
Like adding PATH for cmake, user can add or change the toolchain in “msys64/home/<USER_FOLDER>/.bashrc”.
Add toolchain PATH by “export PATH=<path to toolchain>:$PATH”.
if [ -d "../../asdk-10.3.0" ]; then
    echo "asdk-10.3.0 exist"
    export PATH=/asdk-10.3.0/mingw32/newlib/bin:$PATH
Note
Recommand to use the latest provided toolchain or use the version after 10.3.0
Building the project
Open mingw by double clicking “msys2_shell.cmd”.
Create folder “build” in project/realtek_amebapro2_v0_example/GCC-RELEASE.
Enter the project location: project/realtek_amebapro2_v0_example/GCC-RELEASE/build.
Run “cmake .. -G”Unix Makefiles” -DCMAKE_TOOLCHAIN_FILE=../toolchain.cmake -DSCENARIO=ai_glass” to create the makefile.
Run
cmake --build . --target flashto build and generate flash binary.
Note
If building the project successfully, you can see flash_ntz.bin in the ‘build’ folder
Step 4. Set up GCC Building Environment (LINUX)
Add toolchain to the linux PATH
Dowload and extract asdk-10.3.0-linux-newlib-build-3638-x86_64.tar.bz2 from https://github.com/Ameba-AIoT/ameba-toolchain/releases/download/V10.3.0-amebe-rtos-pro2/asdk-10.3.0-linux-newlib-build-3638-x86_64.tar.bz2
tar -jxvf <PATH_TO_YOUR_TOOLCHAIN.tar.bz2> -C <DIR_TO_EXTRACT>
Add toolchain to PATH:
export PATH=<PATH_TO_YOUR_TOOLCHAIN>/asdk-10.3.0/linux/newlib/bin:$PATH
Note
You can add PATH to ~/.bash_profile
Installing cmake for linux
Install cmake using terminal (like “sudo apt-get -y install cmake”), if the installation is successful, you can get the version by
cmake
--version
.
Building the project
Create folder “build” in project/realtek_amebapro2_v0_example/GCC-RELEASE.
Open linux terminal and enter the project location: project/realtek_amebapro2_v0_example/GCC-RELEASE/build.
Run “cmake .. -G”Unix Makefiles” -DCMAKE_TOOLCHAIN_FILE=../toolchain.cmake -DSCENARIO=ai_glass -DVERSION=x.x.x.x” to create the makefile. Please note that developers have to keep track of their own software version consisting of 4 numbers. Max version is given to be 255.255.255.255.
Run
cmake --build . --target flashto build and generate flash binary.
Note
If building the project successfully, you can see flash_ntz.bin in the ‘build’ folder
If the ‘build’ folder has been used by others, you can remove ‘build’ folder first to have clean build
If there’s some permission issues, you can do “chmod -R 777 <PATH_TO_YOUR_SDK>”
Step 5. Hardware setup (EVB)
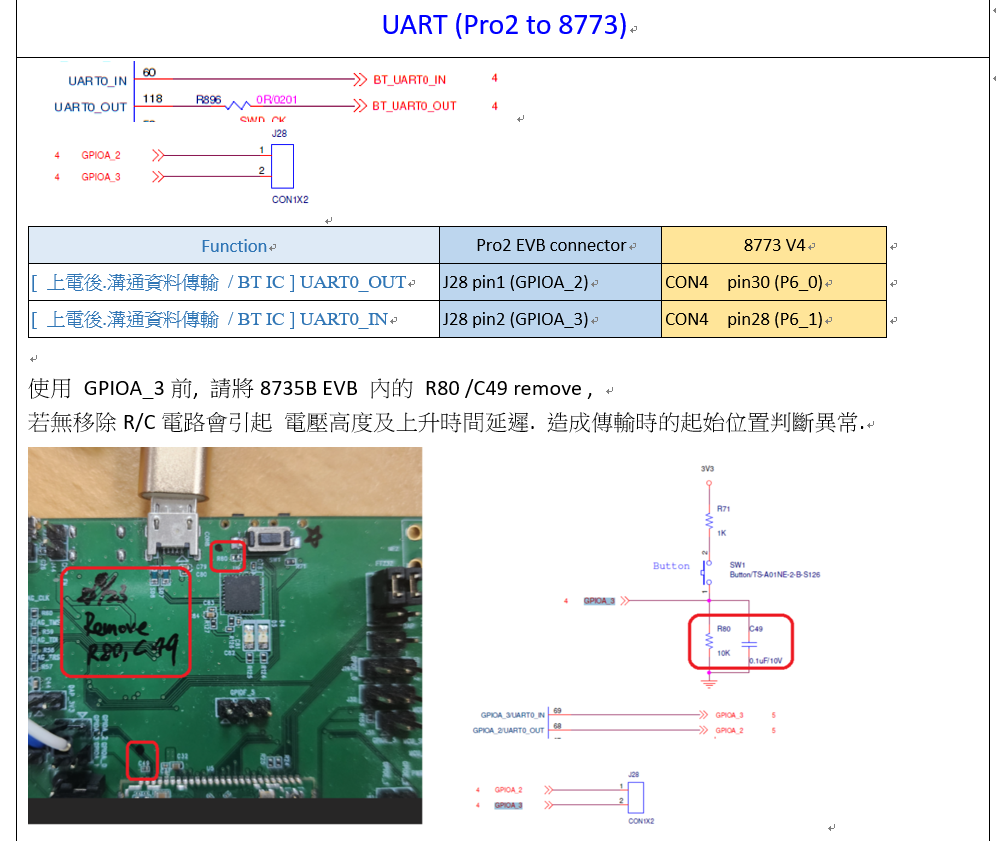
Please take note for the UART connection between 8735B EVB and BT SOC, you will have to remove the R80 resistor and C49 capacitor on the EVB to prevent the abnormality of the UART communication. You may refer to the image below.